When I started depending more and more on e-resources than actual books, I ended up bookmarking every other page that seemed interesting for reading later or just as a knowledge resource.
This process grew haphazardly over time.I had a few bookmarks saved in my laptop and a few other in desktop, and of course I couldn’t import/sync them (Is there a method to do this? I don’t know).
Then I stumbled upon (real stumble!) Instapaper.It helped me save my bookmarks onto their servers.So I can now manage my bookmarks from laptop and desktop or any other device.I can log into my account and edit/delete/share/like my bookmarks etc.The features are best explained in their site.
The USP of Instapaper is its simplicity, right from the homepage to how your bookmarks are treated.It reminded of those WYSIWYG applications.Its so simple that I do not have much to write about it!
You are given a ‘Read Later’ bookmark which can be added onto your bookmark bar and once you want to bookmark any webpage,just click on the ‘Read Later’ bookmark and your webpage is saved.
Instapaper is free, and a premium membership as of now has no added bonuses.But, the creator of Instapaper Marco Arment is one of those shrewd startup minds and he would come up with something sneeky about the premium membership.Why I call Marco Arment shrewd is because of how he handled the iphone paid and free Instapaper apps.More on this can be found here.
Incidently,Marco Arment was involved with tumblr before he started with Instapaper.
Yes,Instapaper is not the first to offer these services.There is evernote,pinboard,deli.cio.us and even the more recent scrible.But Instapaper struck a chord with me with its in-your-face simplicity and functionality.Scrible may have more fancier features but I don’t see them using it.
Till then,Instapaper will do.
PS : I wish the ‘read later’ bookmark had a favicon.
Saturday, July 16, 2011
Adding Gadgets in tumblr
Hack tumblr themes.
By ‘Hack’ I don’t mean an exhaustive modification of code, just a few additions so that, you get the ‘blogger’ experience.
I have noticed that it is not that easy to add a gadget or a widget onto your tumblr account.Here is a brief tutorial on how you can go about it.For example, Have a look at the left hand side bar of this page and you can notice 2 gadgets I have added.
One,the hit counter and another is the AdSanthe gadget which is a project which i worked on for the past 4 months. Know more here.
So, if you want to add gadgets like these, the following tutorial will help you.
Step one : Get the code
Identify what you want to add to your tumblr site. Lets take a hit counter for example, go to hit-counter.info, select the desired type and grab the code.So, whatever gadget you want to add, grab its code.
Step two : Customize
Dashboard -> your site -> Customize
If you are not familiar with HTML the easiest thing to do is
- Click on Info and in the description text box, paste the code that you copied( from hit counter eg.)
Go to step 4.
If you are familiar with HTML, you can easily choose where you want the gadget to be placed.
In the customize page, click on Theme -> Custom HTML
If you want to add the gadget onto the left hand sidebar, find the line where the code for sidebar ends(This is usually commented, so its easy to find it) and just paste the copied code snippet there.
Update
And you are done. This is a very brief tutorial and if you need more help feel free to mail/shout/rant.
Mongodb : ‘Connect failed’ error
Learning Mongodb these days, and encountered this error when starting the mongodb client.

The problem here is that, the mongod daemon has to be started first.The steps to do so is
Ubuntu/Debian
Execute the following command in the terminal
$ sudo /etc/init.d/mongodb start
Fedora/RedHat
$ su
Now, switch to the directory where mongo was installed, and execute the following command in the terminal
# mongodb-linux-xxxx-1.6.x/bin/mongod
This should get the daemon up and running, the normal procedure for starting the mongodb client should then be followed.
Gmail multiple account sign-in
This is an extremely handy feature useful to people who have multiple Google powered mail accounts, a personal Gmail account and another provided at their work.
To enable this feature, go here and select the ‘on’ button.Check the following terms and conditions (as always) and you are set.
Now, to log into multiple accounts :
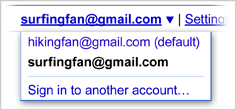
Click your name or email address at the top of the page.
Select Sign in to another account from the drop-down menu.
On the page that opens, enter the email address and password for another account you wish to access, and click Sign in.
Note : The above instructions are the official instructions from Google.Yes, I was too lazy to come up with my own.
Thursday, May 19, 2011
Ubuntu Update Manager/Synaptic package manager error
While updating your Ubuntu distros using the Update Manager or while using the Synaptic Package Manager, if you ever encounter a error like
'E:Encountered a section with no Package: header,
E:Problem with MergeList /var/lib/apt/lists/any name here,
E:The package lists or status file could not be parsed or opened.'
The easiest thing to do is remove all the contents of the mentioned directory /var/lib/apt/lists/ and then populate the lists again.
1. Remove all the entries
$ sudo rm /var/lib/apt/lists/*
2. Populate the entries again
$ sudo apt-get update
This is a short hand trick and do use it at your own risk.
But Linux is all about taking that little extra risk, right?
Wednesday, May 18, 2011
Enabling front panel audio jacks in Ubuntu
When I moved my trade to Ubuntu 10.04 ‘completely’ last year, I had a tough time getting my desktop’s front audio panel.
It was a rather easy affair in Windows XP, I just had to enable a option using Realtek.But, in Ubuntu its not so straightforward albeit not complicated either.
All you have to do is, type the following commands in the terminal
- Open the alsa-base.conf file for editing
$ sudo gedit /etc/modprobe.d/alsa-base.conf - It prompts for the password, after entering it add the following line at the end of the file
$ options snd-hda-intel model=auto - Reboot
This should get it working.
Tuesday, May 17, 2011
c.vim
Recently, I was thinking about the way we write c programs. There are certain set of statements and a few other things that we are bound to use again and again. Like the main routine, the headers, the comments...to mention a few. It would be nice if the editor did these redundant tasks. We would code lot faster. Such features are normally provided in the IDEs, but being a linux user I use vim to code c programs. Vim has so many features, i was sure that it would also have this...and i was darn right about it :)
'c.vim' is a small plugin for vim that converts it into a c/c++ IDE. Adding this to vim considerably increased my coding speed. It provides insertion of complete statements, code snippets, comments and a few more nice features.
Its fairly easy to change the template for the code snippets and the comments. You can also set your personal details like your name to be displayed, your contact etc. You can follow the documentation that is provided with the plugin to customize it to your needs. Once that is done, just take a look at the key combination to perform the actions.
Now open a new c file to code as usual, and you'll automatically be greeted with your information (the personal details which you've set in the template file) and also an empty main routine. The cursors is also placed in the appropriate positions so that you can continue to code.
All the key combinations begins with '\'. for example, '\cfr' creates a frame comment. There are many more available. Make sure to read the 'c-hotkeys' file that is provided with the documentation.
download the c.vim here .
Once you get used to it, you'l definitely code a lot more faster and your code will also follow a consistant format.
Once you get used to it, you'l definitely code a lot more faster and your code will also follow a consistant format.

Subscribe to:
Posts (Atom)